OpenFOAM
- 2021/07/21

In this post we present the main steps required to use git version control while developing a new OpenFOAM case/code and how to collaborate with your team on a OpenFOAM repository hosted in Github.
Step 1) Clone the repository
Let’s suppose that your lead engineer has created a repo on github called “https://github.com/CodeDev” and you want to work on it and add some contributions.
[Notation convention : in the present post, all the command you need to input in the linux terminal are highlighted with bold blue. ]
First it is necessary to clone the repository into your machine using the “git clone” command:
git clone git@github.com:CodeDev.git
A new directory CodeDev will be created. Enter the directory
cd CodeDev
ls -la # among the hidden file you will notice the .git file, indicating that the folder “CodeDev” is a git working tree under git version control
git status # after a fresh clone git will just output that you are on the branch main, and there is nothing to commit, working directory clean
Step 2) Create your local branch to implement your modifications
It is preferable to not work directly on the main branch. Instead create a feature branch with the following command:
git branch yourGitBranch
git checkout yourGitBranch # “checkout” command is used to activate your branch, so that all your new commits will be recorded on “yourGitBranch” and not on the main branch you previously cloned.
Step 3) Make your modification and commit locally
Start making your modifications, change the files you find in the CodeDev directory and/or add new files, directories. From time to time use the “git add” command to track the files you are working on, and do a commit to keep history of your modifications:
git add . # use the “.” to track all the files in the current directory
git commit -m "my Description of commit 1" # add an exhaustive description of your commit
git push origin yourGitBranch # push your local branch to remote
If after your first commit, you need to add new files, for example you needed to add a new STL file for your OpenFOAM case, repeat the same process:
git add .
git commit -m "updated the STL geometry"
git push origin yourGitBranch
Step 4) Fetch updates from remote
When your modifications are completed and you are ready to share them with your team, first use the fetch command to make sure that when you merge your changes back to the main branch you are up to date.
git fetch # the fetch commands downloads commits, files and references from the remote repository into your local repo
Step 5) Compress your commits into a single commit
To keep things neat and clean, before merging your contribution to the main branch, it is better to summarize all your micro-commits into a single macro-commit, so that the main branch has a clean history with only the main commits describing the main steps of development and disregarding the minor modifications.
git rebase -i origin/main # once this command is launched, you will see the interactive rebase tool, with a content similar to the following :
pick 7a3b599 commit1
pick d44f2a0 commit2
Suppose that we want to merge commit2 into commit1, then we need to delete the word “pick” and put “s” instead, as shown below:
pick 7a3b599 updated installation instructions
s d44f2a0 updated installation instructions 2
Then save your modification (in case you are using VIM, with the command “.wq!” )
Now instead of 2 commits, you will have a single neat commit.
Step 6) Merge your changes to the main branch
Now we are ready to move back to the main branch and merge our contribution:
git checkout main
git merge yourGitBranch
git push origin main # pushing your local master branch to remote
Step 7) Clean up
Since your branch is no more needed you can clean it up using the following commands:
git push origin :yourGitBranch # remove your remote feature branch
git branch -d yourGitBranch # remove your local branch
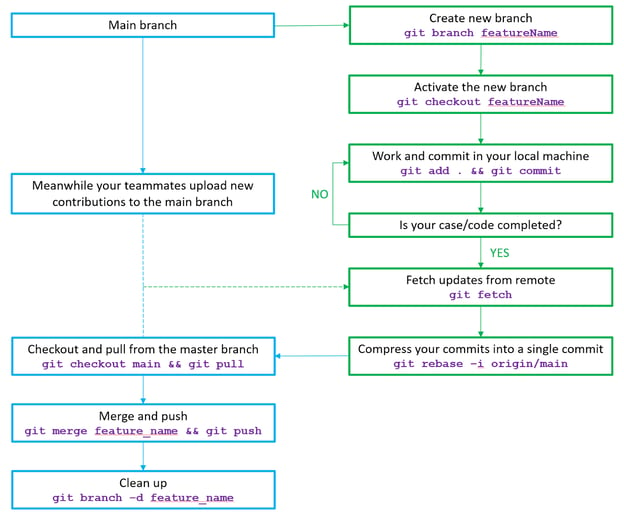
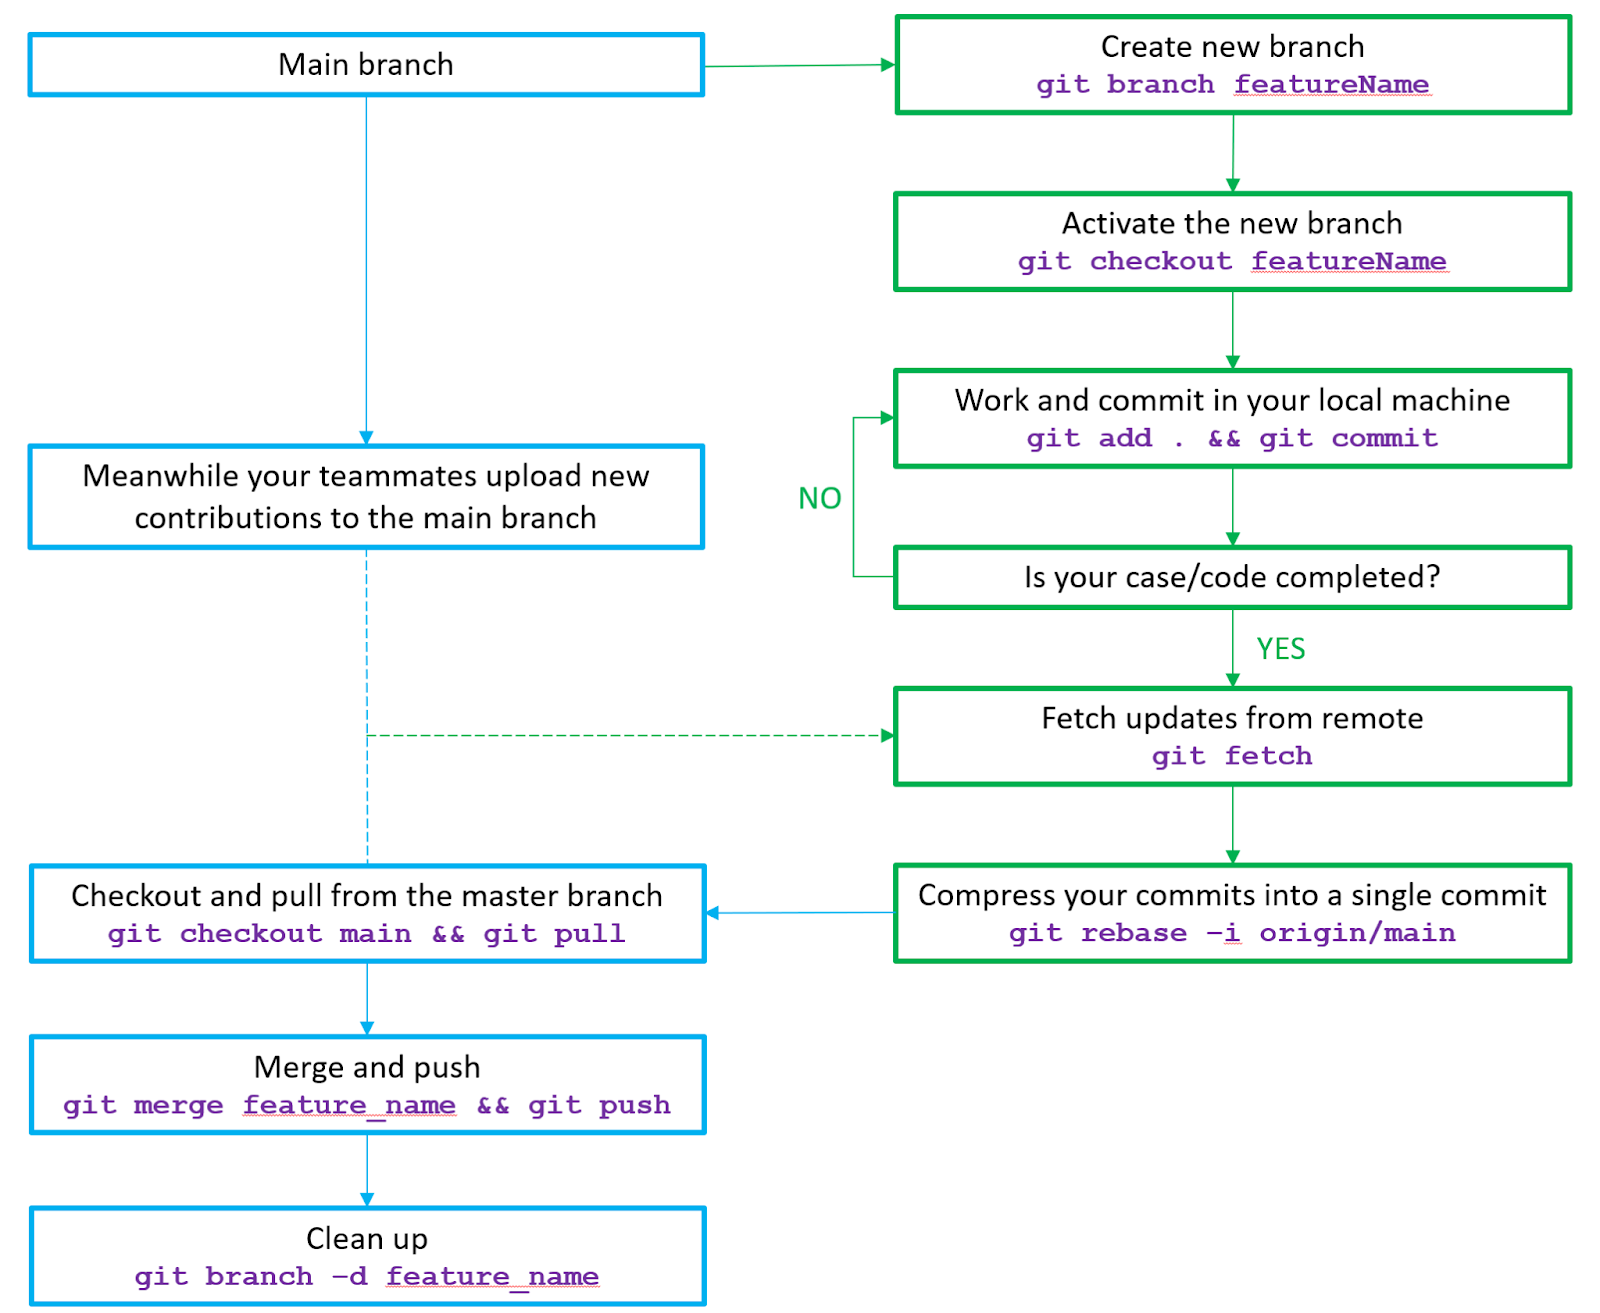
In the picture below, we summarize all the above steps: