
OpenFOAM
- 2022/01/15
In this post we will explain how to build and run OpenFOAM in parallel on a cluster where:
- you don’t have admin rights on the Cluster
- the MPI libraries available on the Cluster are the Intel MPI implementation
- you are not allow to build OpenFOAM directly on the cluster
First let’s check what is the linux flavour of the Cluster:
[ald@Cluster127 ~]$ lsb_release -a
LSB Version: :core-4.1-amd64:core-4.1-noarch
Distributor ID: CentOS
Description: CentOS Linux release 7.7.1908 (Core)
Release: 7.7.1908
Codename: Core
Since we cannot build OpenFOAM directly on the cluster, we will create in VirtualBox a virtual machine (VM) using the same operating system of the cluster CentOS Linux release 7.7.1908 (downloadable from here), so that we end up with binaries that are compatible with the cluster. If you are new to VirtualBox and VM creation, you can follow this tutorial.
Once CentOS virtual machine is up and running we can install all the libraries dependencies required to build OpenFOAM from source code, a detailed guide can be found here, below is the summary list of all the yum command to be launched on the VM machine, as root:
sudo su -
yum -y install dnf-plugins-core
yum -y install epel-release
yum install system-config-users
yum groups mark install "Development Tools"
yum groups mark convert "Development Tools"
yum groupinstall "Development Tools"
yum install openmpi openmpi-devel zlib-devel gstreamer-plugins-base-devel -y
yum install libXext-devel libGLU-devel libXt-devel libXrender-devel -y
yum install libXinerama-devel libpng-devel -y
yum install libXrandr-devel libXi-devel libXft-devel -y
yum install libjpeg-turbo-devel libXcursor-devel -y
yum install readline-devel ncurses-devel python python-devel -y
yum install cmake qt-devel qt-assistant -y
yum install mpfr-devel gmp-devel -y
yum install zlib-static -y
yum install glibc-static -y
yum install qt5-assistant.x86_64 -y
yum install gstreamer-plugins-base.x86_64 -y
yum install --enablerepo=epel qtwebkit-devel -y
Then we can proceed to install the intelMPI library. For our purposes the Runtime license includes everything we need to run Intel MPI-based applications. The license is free and permanent. Here are the installation instruction to run intel MPI on CentOS7:
Create the YUM (DNF) repo file in the /temp directory as a normal user:
cd ~
tee > /tmp/oneAPI.repo << EOF
[oneAPI]
name=Intel® oneAPI repository
baseurl=https://yum.repos.intel.com/oneapi
enabled=1
gpgcheck=1
repo_gpgcheck=1
gpgkey=https://yum.repos.intel.com/intel-gpg-keys/GPG-PUB-KEY-INTEL-SW-PRODUCTS.PUB
EOF
Move the newly created oneAPI.repo file to the configuration directory /etc/yum.repos.d:
sudo mv /tmp/oneAPI.repo /etc/yum.repos.d
Since our goal is to run heavily parallelized jobs on a cluster let’s install the intel high performance computing kit:
sudo yum install intel-hpckit
It will require around 2.8GB in total.
Complete!
[serena@valkyrie ~]$
Once the installation is completed, the packages
intel-oneapi-mpi-2021.5.0.x86_64 0:2021.5.0-495
intel-oneapi-mpi-devel.x86_64 0:2021.5.0-495
will be ready for use. To test if the installation was successful we can perform the test suggested here. Initialize the oneAPI environment with the following command:
. /opt/intel/oneapi/setvars.sh
If everything goes smoothly this command should output the message “:: oneAPI environment initialized ::”. Once checked that the setvars.sh script is working, we can add the following line at the end of the “~/.bashrc” file:
. /opt/intel/oneapi/setvars.sh
in this way when a new terminal is opened, setvars.sh is triggered automatically.
Alternatively it is possible to encapsulate the command in an alias, by adding inside “~/.bashrc”:
# Intel MPI start up
alias intelMPI='. /opt/intel/oneapi/setvars.sh'
Using this option, when a new terminal is opened, it is sufficient to type “intelMPI” to get intel one api environment initialized.
Once oneAPI environment is initialized we are ready to start the api with the command:
oneapi-cli
After that, select Create a Project -> cpp -> and from the list choose for example “matrix_mul” -> then use the tab key to select “create” . You should get in output the following message as confirmation that oneAPI is working.

We can do one more additional test in order to check that intelMPI is ready to roll.
Navigate to the intel MPI installation path /opt/intel/oneapi/mpi/2021.5.0/bin
[serena@valkyrie bin]$ cd /opt/intel/oneapi/mpi/2021.5.0/bin
Inside this directory the mpirun and mpicc scripts are present:
[serena@valkyrie bin]$ ls
cpuinfo hydra_pmi_proxy IMB-MT mpif77 mpigcc mpiicpc
hydra_bstrap_proxy IMB-MPI1 mpigxx mpiifort
hydra_nameserver mpicc mpiexec.hydra mpifc mpirun
Let’s check if mpirun works smoothly by doing the following test :
[serena@valkyrie bin]$ mpirun -np 4 echo "hello"
hello
hello
hello
hello
OK. It works, we are then ready to compile OpenFOAM. Before launching the Allwmake, we need to modify the etc/bashrc file, since we want to use the IntelMPI libraries instead of the default OpenMPI.
NOTE: in the following explanation we will suppose that you have added inside your ~/.bashrc the following 2 aliases:
# User specific aliases and functions
alias OF2112='. ~/OpenFOAM/OpenFOAM-v2112/etc/bashrc'
alias intelMPI='. /opt/intel/oneapi/setvars.sh'
Open a terminal and launch the following commands:
source ~/.bashrc
intelMPI
OF2112
foam
vi etc/bashrc
and inside set the WM_MPLIB variable as follows
“export WM_MPLIB=INTELMPI”
Moreover inside the ~/.bashrc add the path of the intel mpi libraries:
vi ~/.bashrc
Add the following lines:
# INTELMPI
export PATH=/opt/intel/oneapi/mpi/2021.5.0/bin:$PATH
Source again ~/.bashrc, reload OpenFOAM environment variables and start the build by using the following commands:
source ~/.bashrc
OF2112
foam
# start the building
./Allwmake -j 2>&1 | tee log.Allwmake_INTEL_MP
By inspecting the log.Allwmake_INTEL_MP file you will see on the top that the OpenFOAM build is using INTELMPI:
Starting compile OpenFOAM-v2112 Allwmake
Gcc system compiler
linux64GccDPInt32Opt, with INTELMPI intelmpi
Once the building completes, at the end of log.Allwmake_INTEL_MP you will see the following lines confirming that the compiling process finished successfully:
========================================
Finished compile of visualization with OpenFOAM-v2112
Gcc system compiler
linux64GccDPInt32Opt, with INTELMPI intelmpi
========================================
OpenFOAM-v2112
Gcc system compiler
linux64GccDPInt32Opt, with INTELMPI intelmpi
api = 2112
patch = 0
bin = 312 entries
lib = 152 entries
========================================
Let’s test if the motorbike tutorial can now be run in parallel inside the CentOS7.7 virtual machine using the IntelMPI libraries:
serena@valkyrie OpenFOAM-v2112]$ tut
[serena@valkyrie tutorials]$ cd incompressible/simpleFoam/motorBike/
[serena@valkyrie motorBike]$ ls
0.orig Allclean Allrun constant system
[serena@valkyrie motorBike]$ ./Allclean
Cleaning case /home/serena/OpenFOAM/OpenFOAM-v2112/tutorials/incompressible/simpleFoam/motorBike
[serena@valkyrie motorBike]$ ./Allrun
Running surfaceFeatureExtract on /home/serena/OpenFOAM/OpenFOAM-v2112/tutorials/incompressible/simpleFoam/motorBike
Running blockMesh on /home/serena/OpenFOAM/OpenFOAM-v2112/tutorials/incompressible/simpleFoam/motorBike
Running decomposePar on /home/serena/OpenFOAM/OpenFOAM-v2112/tutorials/incompressible/simpleFoam/motorBike
Running snappyHexMesh (6 processes) on /home/serena/OpenFOAM/OpenFOAM-v2112/tutorials/incompressible/simpleFoam/motorBike
Running topoSet (6 processes) on /home/serena/OpenFOAM/OpenFOAM-v2112/tutorials/incompressible/simpleFoam/motorBike
Restore 0/ from 0.orig/ [processor directories]
Running patchSummary (6 processes) on /home/serena/OpenFOAM/OpenFOAM-v2112/tutorials/incompressible/simpleFoam/motorBike
Running potentialFoam (6 processes) on /home/serena/OpenFOAM/OpenFOAM-v2112/tutorials/incompressible/simpleFoam/motorBike
Running checkMesh (6 processes) on /home/serena/OpenFOAM/OpenFOAM-v2112/tutorials/incompressible/simpleFoam/motorBike
Running simpleFoam (6 processes) on /home/serena/OpenFOAM/OpenFOAM-v2112/tutorials/incompressible/simpleFoam/motorBike
Once simpleFoam parallel execution completes, we can check the log.simpleFoam file:
Build : _14aeaf8dab-20211220 OPENFOAM=2112 version=v2112
Arch : "LSB;label=32;scalar=64"
Exec : simpleFoam -parallel -decomposeParDict system/decomposeParDict.6
Date : Jan 12 2022
Time : 19:00:45
Host : valkyrie
PID : 18763
I/O : uncollated
Case : /home/serena/OpenFOAM/OpenFOAM-v2112/tutorials/incompressible/simpleFoam/motorBike
nProcs : 6
Hosts :
(
(valkyrie 6)
)
Parallel execution went smoothly and the 500 directory with the results is present:
[serena@valkyrie motorBike]$ ls
0.orig constant log.patchSummary log.simpleFoam
500 log.blockMesh log.potentialFoam log.snappyHexMesh
Allclean log.checkMesh log.reconstructPar log.surfaceFeatureExtract
Allrun log.decomposePar log.reconstructParMesh log.topoSet system
We are now ready to deploy our Virtual Machine OpenFOAM build into the cluster.
Compress the build and send the tgz file into the ~/OpenFOAM of the cluster via scp:
foam
cd ..
tar -zcvf OpenFOAM-v2112_IntelMPI.tgz OpenFOAM-v2112/
tar -zcvf ThirdParty-v2112_IntelMPI.tgz ThirdParty-v2112/
scp -r *tgz ald@127.**.**.**:~/OpenFOAM
Log into the cluster and uncompress the tgz files:
cd ~/OpenFOAM
tar -zxvf OpenFOAM-v2112_IntelMPI.tgz
tar -zxvf ThirdParty-v2112_IntelMPI.tgz
Source OpenFOAM bashrc using the following command:
source ~/OpenFOAM/OpenFOAM-v2112/etc/bashrc
You will get the following error:
openfoam (etc/config.sh/mpi) => invalid INTELMPI directory
=> unset
Please set I_MPI_ROOT (or MPI_ROOT) correctly.
since we need to set the I_MPI_ROOT variable to point to the location where the intelMPI is installed. This location is usually provided by the admin Cluster documentation, in our case the location was /nisProduction/impi/2020.7.271/bin64/impi/2018.4.274/bin64/
Therefore we need to set the I_MPI_ROOT variable by launching in terminal the following command:
echo $I_MPI_ROOT
/nisProduction/impi/2020.7.271/bin64/impi/2018.4.274/bin64/
Now if we relaunch the same previous command to source OpenFOAM
[ald@Cluster127 ~]$ source /nishome/ald/OpenFOAM/OpenFOAM-v2112/etc/bashrc
[ald@Cluster127 ~]$
nice and clean, no more error messages. Now the OpenFOAM commands should be available in our Cluster terminal, let’s check for example the following command
blockMesh
The blockMesh command is now recognized but it is immediately followed by the error message:
blockMesh: error while loading shared libraries: libmpi.so.12: cannot open shared object file: No such file or directory
To avoid this error, we need to set the path of the libmpi.so.12 library so that OpenFOAM can load it. This library should be located in the same path where the Intel MPI library is installed, in our case “/nisProduction/impi/2020.7.271/bin64/”. To find its exact location inside the cluster let’s launch the following command:
[ald@Cluster127 ~]$ find /nisProduction/impi/2020.7.271/bin64/ -name "libmpi.so.12"
and the command gives the exact location of libmpi.so.12:
/nisProduction/impi/2020.7.271/bin64/compilers_and_libraries_2018.6.288/linux/mpi/intel64/lib/release/libmpi.so.12
Therefore we can set the library path using the following command:
[ald@Cluster127 ~]$ export LD_LIBRARY_PATH=/nisProduction/impi/2020.7.271/bin64/compilers_and_libraries_2018.6.288/linux/mpi/intel64/lib/release/:$LD_LIBRARY_PATH
And if we enter inside an OpenFOAM case, for example the cavity tutorial and retry the “blockMesh” command, no more error:
[ald@Cluster127 cavity]$ blockMesh
Build : _14aeaf8dab-20211220 OPENFOAM=2112 version=v2112
Arch : "LSB;label=32;scalar=64"
Exec : blockMesh
Date : Jan 14 2022
Time : 04:29:04
Host : Cluster127
PID : 5335
I/O : uncollated
Case : /hpc-master/ald/project/cavity
nProcs : 1
trapFpe: Floating point exception trapping enabled (FOAM_SIGFPE).
fileModificationChecking : Monitoring run-time modified files using timeStampMaster (fileModificationSkew 5, max
FileModificationPolls 20)
allowSystemOperations : Allowing user-supplied system call operations
// * * * * * * * * * * * * * * * * * * * * * * * * * * * * * * * * * * * * * //
Create time
Creating block mesh from "system/blockMeshDict"
[...]
----------------
Patches
----------------
patch 0 (start: 760 size: 20) name: movingWall
patch 1 (start: 780 size: 60) name: fixedWalls
patch 2 (start: 840 size: 800) name: frontAndBack
End
Serial execution is now successful. As next step we need to test a parallel execution using the slurm queueing system of the cluster. For this we will create the script “Takeoff_OF2112_parallel” to be saved inside the OpenFOAM case directory. Inside this script we need to copy the commands we previously used to set I_MPI_ROOT variable and the location of the libmpi.so.12. Here are the full contents of Takeoff_OF2112_parallel:
#!/bin/bash
#
#SBATCH --job-name=UBIK
#SBATCH --output=slurm_output.%j.out
#SBATCH --error=slurm_error.%j.err
#SBATCH -D /hpc-master/ald/project/cavity
#SBATCH --get-user-env
#SBATCH --clusters=Cluster127
#SBATCH --ntasks=4
#SBATCH --nodes=1
#SBATCH --ntasks-per-core=1
#SBATCH --exclusive
#SBATCH --partition=vshort_c16m128
rm -rf log* processor* slurm_*
export CPUS=4
#Load the environment
source /nishome/ald/OpenFOAM/OpenFOAM-v2112/etc/bashrc
# MPI Intel
export I_MPI_ROOT=/nisProduction/impi/2020.7.271/bin64/impi/2018.4.274/bin64/
export PATH=/nisProduction/impi/2020.7.271/bin64/impi/2018.4.274/bin64/:$PATH
export LD_LIBRARY_PATH=/nisProduction/impi/2020.7.271/bin64/compilers_and_libraries_2018.6.288/linux/mpi/intel64/lib/release/:$LD_LIBRARY_PATH
# Source tutorial run functions
. $WM_PROJECT_DIR/bin/tools/RunFunctions
blockMesh >> log.blockMesh.$SLURM_JOB_ID
decomposePar -force >> log.decomposePar.$SLURM_JOB_ID
mpirun -np $CPUS icoFoam -parallel >& log.icoFoam.$SLURM_JOB_ID
And we are finally ready to submit the job and running it in parallel using the slurm “sbatch” command:
[ald@Cluster127 cavity]$ sbatch Takeoff_OF2112_parallel
Submitted batch job 2290243 on cluster Cluster127
Once the job completes, we can check if the parallel execution was successful:
[ald@Cluster127 cavity]$ ls
0 log.decomposePar.2290243 processor1 system
constant log.icoFoam.2290243 processor2 Takeoff_OF2112_parallel
log.blockMesh.2290243 processor0 processor3
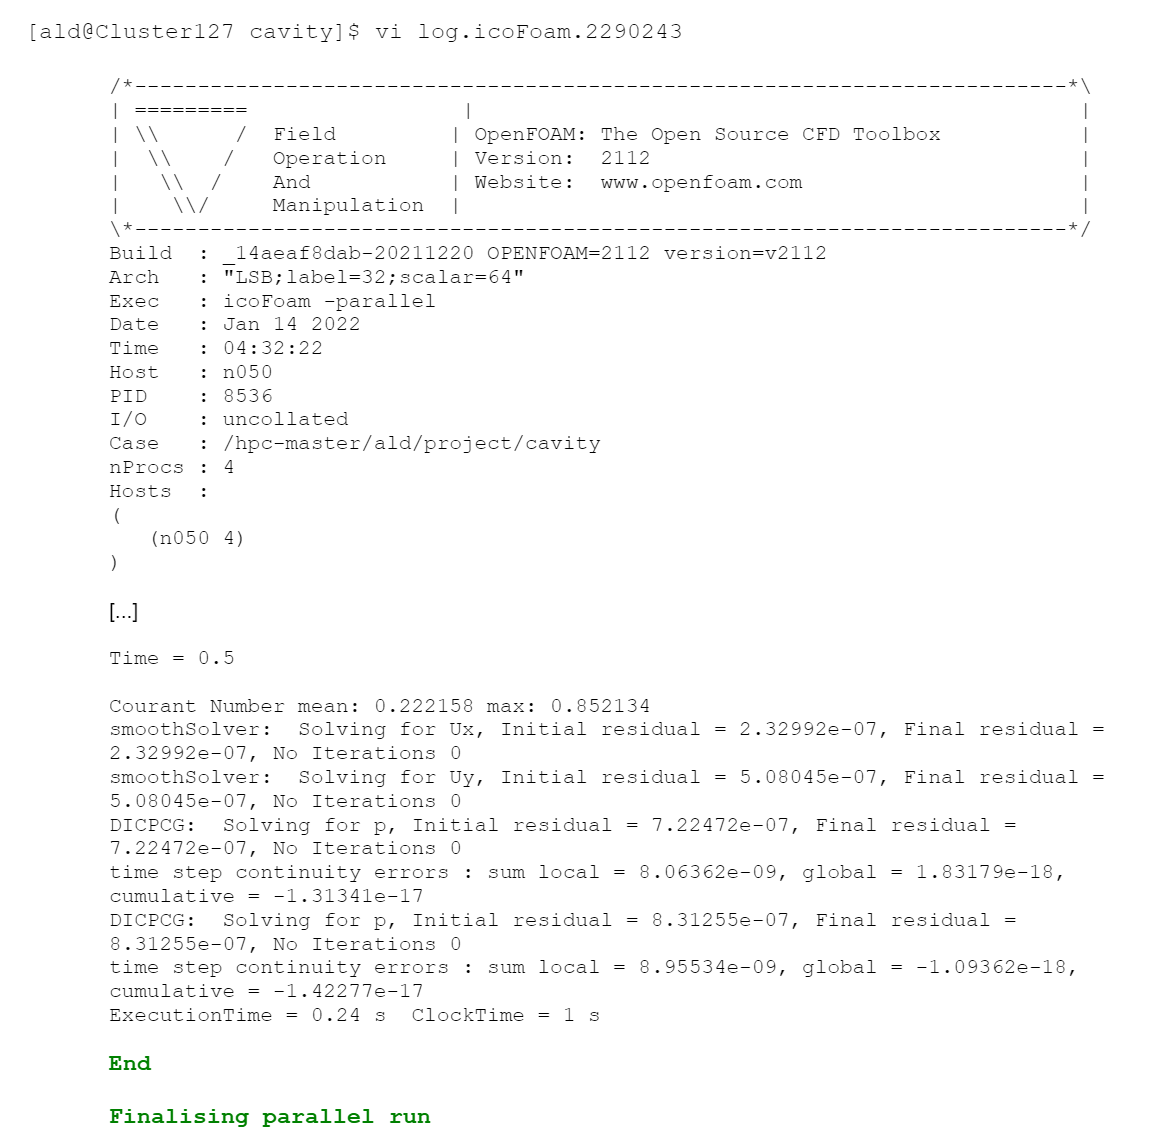
[ald@Cluster127 cavity]$ vi log.icoFoam.2290243
Build : _14aeaf8dab-20211220 OPENFOAM=2112 version=v2112
Arch : "LSB;label=32;scalar=64"
Exec : icoFoam -parallel
Date : Jan 14 2022
Time : 04:32:22
Host : n050
PID : 8536
I/O : uncollated
Case : /hpc-master/ald/project/cavity
nProcs : 4
Hosts :
(
(n050 4)
)
[...]
Time = 0.5
Courant Number mean: 0.222158 max: 0.852134
[...]
ExecutionTime = 0.24 s ClockTime = 1 s
End
Finalising parallel run
Parallel execution can now be run without issues.
Conclusion: with the above procedure we have shown how to safely install the required OpenFOAM dependencies packages and then build OpenFOAM inside a virtual Machine using the same Operating System and MPI libraries of the target Cluster machine. Once the binaries are copied inside the cluster, we can run the job in parallel by using a script where we set the paths to correctly initialize the MPI environment variables of the cluster. In this way you can test your new OpenFOAM builds without the need of Cluster administrator privileges.
REFERENCES
- Rehat intelMPI installation instruction
- Intel MPI installation instruction guide https://registrationcenter-download.intel.com/akdlm/irc_nas/1718/INSTALL.html?lang=en&fileExt=.html
- Getting started with intel one API
- Intel MPI Library for Redhat using the yum package manager
https://www.intel.com/content/www/us/en/developer/tools/oneapi/hpc-toolkit-download.html
- Intel Mpi library licencing